Concepts
What the designer edits, and how the three things on its toolbar relate: a character, a map, and a library. Five minutes here makes the rest of the chapter read as one tool rather than four tabs.
The Library
The map says which blendshapes on this rig make a target. The library says what the targets are. It is the shared catalogue a map is authored against: the recipes that exist, what each one means, its icon, which group it belongs to, and for expressions, how each arrives and leaves. A map on a Daz figure and a map on a VRoid character are authored against the same library, and that is why one performance drives both.
There is one library per channel, and it is fixed. On speech, prosody, eyes and the loudness track that is the design rather than a gap: what those channels play is decided by the audio and by drivers tuned against that exact vocabulary, so a target you invented would have nothing to drive it. The toolbar's Library pillar names the one this channel is reading.
Authoring Your Own Is on the Roadmap
The set worth opening up is emotion and expression, because those are names you write into a script rather than phonemes the audio decides for you. That covers the emotion channel's layered map and its solid one, along with the expressions the layered map is built from. For now they ship on a fixed library like the rest.
How any of them looks on your character is already yours. Reshaping a shipped emotion on your own rig is what this window is for. What is not there yet is the set itself, so you cannot add a 29th emotion or rename one. Nor can you retime a layered emotion: which expressions it is built from, how much of each, and when each arrives and leaves inside it all ship with FaceCue. Layered sets out which half of that is yours.
That was held back on purpose. Extending a vocabulary well needs a surface that helps you do it, one that shows what a new name will look like on the face and catches a name that collides with something already there. Building that first is the reason the door is still shut. It is on the roadmap.
The Character & Its Map
The designer works on a character, the one whose brain is in the toolbar's Brain field. Binding a brain does three things: the maps its drivers use become the maps you are editing, its meshes become the blendshapes the picker offers, and its face becomes the one the recipe is drawn on while you edit.
Two dots on the toolbar say where you stand. The Brain dot is about the character, the state dot is about the map you have open, and read together they tell you whether an edit is reaching anything.
 1
2
1
2
The Brain Dot 1
It says whether a character is bound, and whether that character has a map for the channel you are on.
| Dot | What it means |
|---|---|
| Green | A character is bound and has a map for this channel. |
| Yellow | A character is bound, but it has no map for this channel. |
| Grey | No character is bound. |
The State Dot 2
It says what the window is editing, set against the map the character uses. Two questions settle which of the four states you are in: is a character bound, and is the window editing that character's own map.
| State | What it means |
|---|---|
| Mirrored | A character is bound and the window is editing its own map. Edits reach the character directly. This is the normal state. |
| Decoupled | A character is bound, but the window is editing a map the character does not use. That is a different map when the character has one, and any map at all when it has none. Nothing reaches the character until you choose Assign To Brain. |
| No Map | A character is bound, it has no map for this channel, and the window has nothing open either. Make a map or load one, and the state becomes Decoupled until you assign it. |
| No Brain | No character is bound. Grey while nothing is open, and yellow while you edit a map on its own, with no rig to show it on. |
The difference between No Map and Decoupled is only whether the window has a map open. A character with no map shows a yellow Brain dot either way. Its state dot is grey while the window is empty and turns yellow the moment you open a map, and Assign To Brain then puts that map in the character's empty slot.
Decoupled is also how you try a map without committing to it. Load an alternative, look at it on the character, and either assign it or drop it. The character's own binding is untouched until you say so.
The Map Menu
The Map dropdown holds everything you can do to the map itself. Its rows come in three groups, always in the same order, and a row that does not apply to the current state is left out.
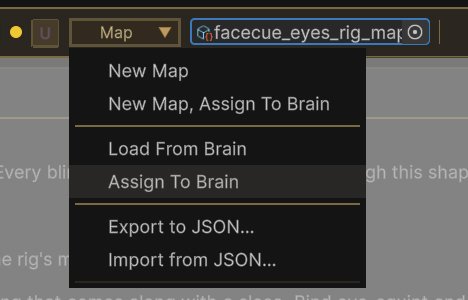
Making a map.
- New Map makes a map and opens it in the window. You choose what it starts from: blank, a copy of the map you have open, or, with a character bound, a OneClick family. The new map is not assigned to anything, so with a character bound the state becomes Decoupled.
- New Map, Assign To Brain does the same and puts the new map on the character at once, which leaves you Mirrored. If the character already has a map it asks first, and the old file stays on disk.
Moving a map between the window and the character. These two appear only in the Decoupled state.
- Load From Brain closes the map you have open and goes back to the character's own. It only changes which file the window is editing, since your edits to the other map are already saved in it. It is missing when the character has no map to load.
- Assign To Brain points the character at the map you have open. If the character already has a map it asks first, and the old file stays on disk.
The JSON round trip.
- Export to JSON… writes the open map to a file. It is greyed while nothing is open.
- Import from JSON… reads one back. With a map already open it asks whether to create a new map from the file, leaving the open one alone, or to replace every recipe in the open map, which Ctrl+Z undoes. In the Mirrored state that replacement lands on the character's own map.
Map, Recipe, Component, Bind
Four levels, each one inside the last. A map is the file. A recipe is one target in it. A component is a named part of a recipe. A bind is one blendshape and how much of it that part takes.
Almost all the work you do in the designer happens at the bind level. The three levels above it exist so that work stays findable, reusable and possible to change in one place.
The Map
Every part of FaceCue that moves the face does it through a map: a small asset that says which of this particular rig's blendshapes stand for which target. There is one map per part. Speech has a viseme map and a loudness map, emotion has a layered map and a solid one, and prosody and the eyes have one each. The OneClick Wizard writes them, and the designer is where you open them.
A map is not only its recipes. It also carries the renderer groups, which decide the meshes anything in it is allowed to write to, and a region for the whole file that every level below can inherit. That is why swapping a map swaps a coherent set of decisions rather than a list of blendshape names.
Each map is bound to the character on the driver that uses it, in a slot on that driver's inspector. The designer's toolbar shows you which map you have open and whether it is the one the character is actually bound to, which is the state dot.
The Recipe
A map is a list of recipes, one per target: the ah mouth, a blink, a brow raise, a smile. What targets exist is not up to the map. The library declares them, which is why the same performance drives every character. A recipe the library declares that this map does not carry yet sits in the recipe picker's Newly Available section, with a plus to add it.
A recipe holds components, or binds sitting directly at its root, or both. A viseme is usually a handful of binds at the root. A look direction on the Eyes channel is three components, because there the split does a job.
What a Recipe Row Offers
Right-clicking a recipe in the left picker gives you the actions that work on the whole recipe at once.
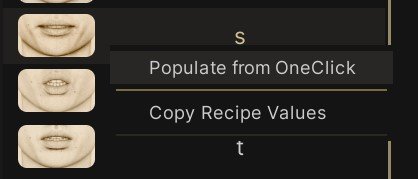
Populate from OneClick builds this one recipe's binds from a family template, reading the character's own rig to do it. It is the per-recipe version of what the wizard does for the whole map, and it is the fastest way back when a single recipe has been edited into a corner. It needs a character bound, and says so when there is none.
Copy Recipe Values and Paste Recipe Values move a whole mapping from one recipe to another. Pasting onto a recipe that already holds binds asks whether to merge or replace, and shows you what each would produce before you commit. A paste only lands on the same channel, so an expression cannot be pasted onto a viseme.
The recipe clipboard survives changing the map, which is the useful part: copy a recipe on one character, open another character, paste it there.
The Component
A component is a named part of a recipe, holding the binds that move that part: the jaw, the lips and the tongue of a viseme, or the brow, the lids and the eyes of a look.
On the Eyes channel components do a specific job, and the library declares them, so they cannot be added or removed. Each one is driven differently, which is the reason they are split at all. Everywhere else they are yours. Add them when a recipe has grown enough that grouping helps, leave them out when it has not, and drag a bind from one to another when it is in the wrong place.

The header carries the component whole. Folding it away gets a long recipe back to a readable length, and the count tells you what is inside without unfolding it. Enabled takes everything in the component out of the performance without deleting any of it, which is the quickest way to find out what a part of the face was contributing. The pip is the component's region, and the question mark is what the library says this component is for, so it appears on the channels whose components mean something.
The button beside the count switches this component into a list of every blendshape on the rig, each as a slider, which is the other way to author: instead of naming a blendshape and giving it a weight, you move sliders until the face looks right and anything you leave at zero stays out.
Binds that belong to no component sit together under a divider at the bottom of the recipe. Nothing is wrong with them. A recipe that is small enough to read at a glance never needs more.
Right-clicking the chrome of a component, or the empty strip below the loose binds, offers the component's own copy and paste, plus the paste for a single bind.
The Bind
A bind is the only thing here that touches the rig: one blendshape, and the weight it is driven to when the recipe plays. Tuning a character is mostly adding binds, removing them, and changing those weights.
One Blendshape, or a Left and Right Pair
A bind comes in two kinds, and the row tells you which you are looking at.
 1
2
3
4
5
6
7
8
9
10
11
1
2
3
4
5
6
7
8
9
10
11
- The kind.
 flips a single bind to a pair: the blendshape carries to the left, the right starts empty.
  flips a pair back, keeping the side that has a blendshape.
 - The pencil. Binds a blendshape here, or swaps the one bound, through the blendshape picker.
- The blendshape. The blendshape this bind drives, as its core name. The mesh prefix and the group's prefixes and suffixes are trimmed, so
Genesis9Mouth__facs_bs_MouthFunnel_div2reads asfacs_bs_MouthFunnel. That is what lets one bind reach every mesh's copy of it, and it is set up under Renderer Groups. - Presence. One dot per renderer group: whether the blendshape exists on that group's meshes, and whether it moves anything there. A present but dead blendshape drives nothing. The picker hides fully dead blendshapes unless you ask for them, and the Blendshape Census measures the rest. Hover a dot for the per-renderer breakdown.
- The renderer pin. Narrows this bind to particular renderer groups. Rarely needed: the map's renderer groups and each driver's own selection already filter, and dead blendshapes are dropped. Needs two or more groups to mean anything.
- The region. Which band of the face this blendshape belongs to. See Regions.
- The weight. How far the blendshape is driven when the recipe plays at full strength.
- Remove. Takes the bind out of the recipe.
- A pair is one bind with two blendshapes. The strip holds what the sides share: one pin, one region, one weight, one remove. Only the blendshapes differ.
- Mirror Sides. Fills the empty side by reflecting the left and right tokens in the other side's name, so
mouthFunnelULgivesmouthFunnelUR. With both filled it asks which to replace. - Each side. Its own blendshape, pencil and presence dots, marked L and R.
A pair is the right shape for anything the face has two of. It is also how you author an asymmetry on purpose: flip to a pair, then give the two sides different weights of different blendshapes, and the character keeps a mouth that pulls further to one side.
The Renderer Pin
The pin column does two jobs, and it is worth knowing which one it is doing before you click it.
 1
2
3
1
2
3
- The badge, with nothing pinned. A readout of where the blendshape reaches: Any for every group the channel drives, the group names for some of them, (No Match) for none. A lock marks the other case, a pin you set.
- Everything (No Pin) is the unpinned state. Choosing it clears the pin rather than selecting every group.
- The groups the map declares, each with its presence dot. Pick one or several.
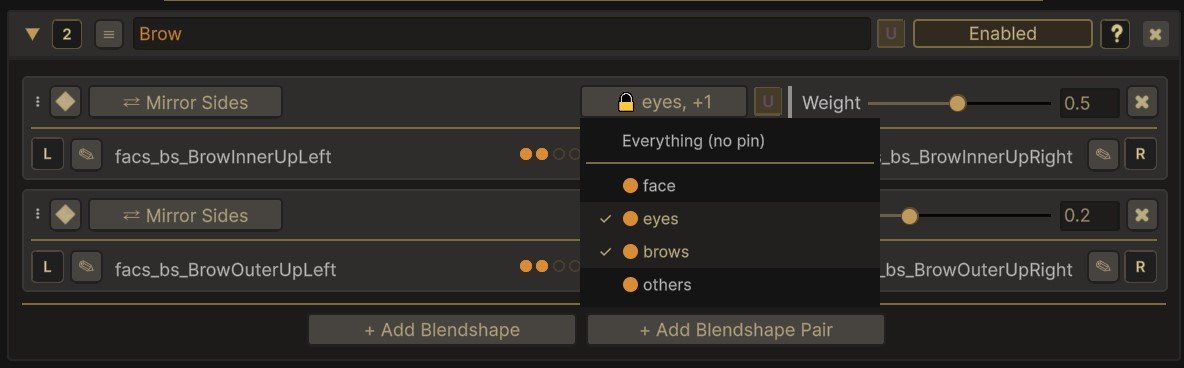
Once you have picked, both the badge and the list say so, and they say it with a tick rather than with the dots.
 1
2
3
1
2
3
- The lock. The badge is stating your choice now, not reporting. Names shorten with a count when they will not fit: eyes, +1 is eyes and brows.
- The tick. The selection, and the only thing that marks it. Two of the four groups here.
- The dot. Presence, in the group's colour, not selection. Every group carries one whether it is pinned or not, and it is the same dot the bind row carries.
A pin only ever narrows. It never reaches a group the driver has switched off, see Disabled Is Final.
You need any of this rarely, and on a map with fewer than two groups the column greys out altogether and reads Any, because there is nothing to choose between. The case it exists for is a blendshape the rig carries on more than one mesh where you only want one of them to move, which is easier to recognise once Renderer Groups has said what a group is.
Cut, Copy and Paste a Bind
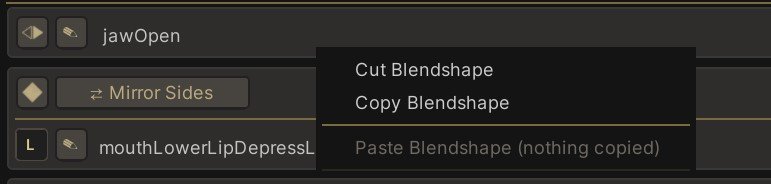
Right-clicking a bind row copies it, cuts it, or pastes one you took from somewhere else. A cut moves the bind rather than duplicating it, in a single undo step.
Paste tells you why it cannot run rather than going quiet: Nothing Copied when the clipboard is empty, and Not Allowed Here when the bind cannot live where you are trying to put it.
This is the quickest way to move one blendshape between recipes, and between the components of a recipe, when you have bound something in the wrong place.
The Blendshape Picker
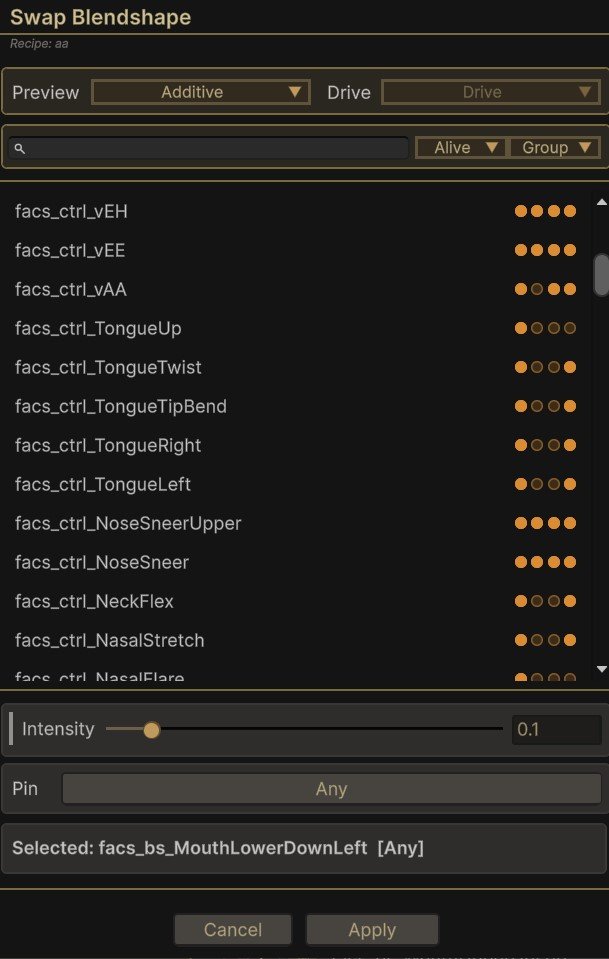
Clicking a bind's blendshape name opens the picker. It is the same window whether you are adding a bind or replacing one, and its title says which: Add Blendshape or Swap Blendshape.
 1
2
3
4
5
6
7
8
9
10
11
12
1
2
3
4
5
6
7
8
9
10
11
12
- The title. Swap Blendshape when you are replacing a blendshape, Add Blendshape when you are adding one. The line under it names the recipe you are working in.
- Preview, either Additive or Individual. Additive drives the whole recipe with the candidate composed in, Individual drives the candidate alone.
- Drive is read only here. It reports the designer's own drive mode, which changes on the main toolbar.
- The search field. Parts of a name match in any order, and letters may be skipped inside a part, so
mthFnlfindsMouthFunnel. - Alive or All. Alive lists only blendshapes that move geometry on some group's meshes. All lists everything the rig carries, for a character whose census is missing or stale.
- Group or Raw. Group folds a blendshape's copies across the meshes into one row. Raw lists one row per copy, named as that mesh carries it.
- The list. A blendshape another component on this recipe already uses is dimmed and ticked, and its tooltip names the owner.
- The presence dots. One per declared renderer group, in the group's colour, in the four states the bind row uses. Hover one for the per-renderer breakdown.
- Intensity is the weight the bind takes when you confirm. The preview follows it as you drag.
- Pin sets the [renderer pin](#the-renderer-pin) for the bind you are about to write. Any leaves it unpinned.
- Selected is the blendshape and pin as they will be committed. Click it to scroll the list back to that blendshape.
- Cancel and Apply. The right button reads Add when you are adding and Swap once you have picked a different blendshape than the bind had.
Nothing is written until you confirm, so the preview is free: pick a blendshape, drag the intensity, and look at the character before deciding.
Regions
Speech and emotion play on the same face at the same time, and Emotion sets out how they share it. For that to work, FaceCue has to know where on the face each blendshape lives. That is what a region is.
FaceCue works this out on its own, and on the shipped families it gets it right. Most channels stay in one part of the face, and the pips say which. Emotion is the one channel that genuinely crosses the face, since a smile reaches the cheeks and the eyes as well as the mouth, so FaceCue places each of its blendshapes on its own, from its name.
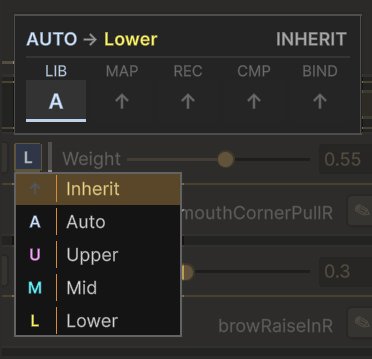
Every level can say otherwise, and each inherits from the one above unless it does: the library at the top, then the map, a recipe, a component and a single bind. The pip beside each level shows the region in force. Hovering it lays out that chain and lights the level that decided, and a recipe whose library fixes its region reads Locked.
The bind is the level to think about, since it is the one blendshape whose placement might be wrong. Its dropdown offers:
- Inherit, take whatever the level above says. The default.
- Auto, let FaceCue place this blendshape from its name.
- Upper, Mid or Lower, pin it to a band.
Changing the region on a recipe or a component moves everything beneath it at once.
When You Should Edit This
Rarely, and for one of two reasons.
You added blendshapes FaceCue did not author. On speech, the eyes and prosody, a bind you add takes its recipe's region, which suits a blendshape from the same part of the face and does not suit one from somewhere else. The common case is a viseme. Everything on it lands in Lower, so a cheek blendshape you add there wants Mid. If you are not sure, Auto reads the blendshape's name and places it for you.
Upper Takes a Blendshape Away From Speech
Speech does not drive the upper face at all. A blendshape on a viseme pinned to Upper does not move while the character talks, and neither does one that Auto files there from its name.
Auto misplaced a blendshape on emotion. Emotion places every blendshape by reading its name. The shipped families name their blendshapes plainly, so this rarely goes wrong on them. An export that renames blendshapes to something unusual or misleading, or to names that say nothing at all such as Shape_014, leaves Auto nothing to read, and a blendshape it cannot place is treated as part of the mouth. If an emotion's cheeks or brows go quiet whenever the character talks, check the pips on those binds first.
What the Designer Does Not Own
Two things sit outside it. How an emotion is assembled from expressions, the share and timing each one takes, lives in the emotion library, not on the map, so the designer previews it but does not edit it. And the bones the gaze and the head move on are set up on the drivers, under Gaze Setup, because they belong to the character rather than to a map. The designer is about blendshapes.