Speech Channel
The viseme map and the loudness bands.
Speech reaches the face through two maps, and the channel mode at the top of the window says which one you are editing. Baked Phoneme opens the viseme map, which the Live Viseme drive mode plays as well. Live Amplitude opens the amplitude map, which only Live Amplitude plays. Which drive mode a character uses is set on its Speech driver, and covered under Drive Modes.
The Viseme Map
What a Viseme Is
A viseme is the position the mouth takes for a group of phonemes. Many phonemes that are easy to tell apart by ear look the same on a face, so FaceCue works in visemes rather than in one shape per phoneme: each recipe in the map is one position of the mouth, and every phoneme that looks like it shares it.
A viseme is played whole. When a phoneme calls for it, the whole recipe blends in against the visemes around it, and what changes from moment to moment is how much of it shows and for how long. Coarticulation covers how neighbouring phonemes shape that.
The Description
Every viseme opens with a description written for it, in three parts:
- What it looks like. The position itself: how far the jaw drops, what the lips and tongue are doing, and what the shape leaves alone.
- When it plays. Which phonemes land on it, with example words to say out loud while you look at it.
- How to build it. What to bind on your rig, and what to keep out.
The description comes from the viseme library, so it is the same advice on every character. Read it before you bind anything. It is the quickest way to know what a shape is for, and several of them are deliberately quiet, which the description says.

Beside it is the reference image, the shape you are aiming at. Front, Three-Quarter and Tongue show it from the angles a single view cannot, and the Settings menu decides which view the list and the header use.
The Speech Pad
The reference image shows a viseme at full strength, but speech rarely plays one there. The speech pad lets you drive the open viseme by hand, at any strength, so you can see what your shape does on the way up as well as at the top.
 1
2
3
4
5
6
7
1
2
3
4
5
6
7
- The two buttons. Back to the reference image, and the pad moved to a column of its own beside it.
- The drive line. What the face is showing right now. Drag it along the bar.
- The Base Pose line. Where this viseme's base pose sits. Its colour matches the dot.
- Drive. Where the drive line is, from 0 to 1.
- The base dot. Green when something on this character uses the base pose. Hover it for every feature that can, with the ones using it now marked.
- Max and Base. Where the drive line returns when you let go.
- Pin. Holds the drive line where you let go.
- Open it with the pad button on the reference image. On the pad, a button in the same corner brings the image back.
- Drag along the bar to set the drive, from nothing to the shape at full. The readout beside it shows the level.
- Let go, and the pose returns to where Max or Base says. Max parks it at full. Base parks it on the viseme's base pose.
- Pin holds the pose wherever you let go, instead of letting it return.
The Base Pose line, Base and the dot all refer to the viseme's base pose, the least of the shape speech lets it show, covered next.
The pad works with the drive on Drive or Off. On Mirror the recipe always shows at full, so that edits you make on the rig itself are captured as authored. The drive modes are under Driving the Character.
The Base Pose
Each viseme has a base pose: the least of the shape that speech will let it show, so that a quiet or unstressed phoneme still reads as itself. It is a floor under the voice rather than an addition to it, it ships with the viseme library, and whether a character uses it is set on its Speech driver. Base Pose in the Speech chapter explains it in full.
On the pad, the Base Pose line marks where the open viseme's base pose sits on the bar. Base parks the pose there when you let go, so you can see the least of your shape the character will ever show. It is worth looking at a viseme there as well as at full.
The dot is green when anything on this character uses the base pose. Hover it and it lists every feature that can read the base pose, each marked as using it, switched on but aimed elsewhere, or off. When nothing uses it, the shape can fall all the way to neutral, and the line is only for reference.
How to Make the Shapes Work Together
This is the advice the channel carries under the same title, and it is about the set rather than any one viseme. Visemes play in quick succession, and what carries speech is the change from one shape to the next, so a set that agrees with itself matters more than any single shape being perfect.
Push a little past what looks right. Held still, a well-judged viseme looks slightly overdone. In speech it is not, because each one gets a fraction of a second and the mouth is already moving on before it fully arrives. Take each shape a step beyond comfortable, then stop well short of distortion. The quiet visemes are the exception and stay quiet, and each one says so in its description.
Use one blendshape for one job, everywhere. Pick the blendshape you want for jaw opening and use that same one in every viseme that opens, then do the same for pucker, funnel and the other characteristic blendshapes. Two blendshapes doing nearly the same job in different visemes make the mouth jump as speech moves between them, and that shows far more than either blendshape being slightly off.
Keep speech and emotion on separate blendshapes. Where the rig gives you enough to choose from, leave the blendshapes you use for emotion out of the visemes. Speech and emotion play at once, and on separate blendshapes both can show in full. On the same blendshape they have to share it, and neither shows as fully as it could. On a smaller rig some overlap is unavoidable and perfectly fine. It just wants to be a decision rather than an accident.
The Amplitude Map
Live Amplitude has no phonemes to read, only how loud the voice is. So its map is a set of recipes, each tied to a band of loudness, and the mouth moves through them as the voice rises and falls. Unlike the viseme map, the set is yours: add, remove and reorder recipes in the list. Under Linear and Curve, each one's place in the list is its place up the loudness range.
With only Basic showing, the map keeps Amplitude Mode and, in each recipe's settings, its Recipe Name and Response Curve. The rest below are Advanced rows. Basic, Advanced & Expert says where the selector is.
 1
2
3
4
5
6
7
8
9
10
11
1
2
3
4
5
6
7
8
9
10
11
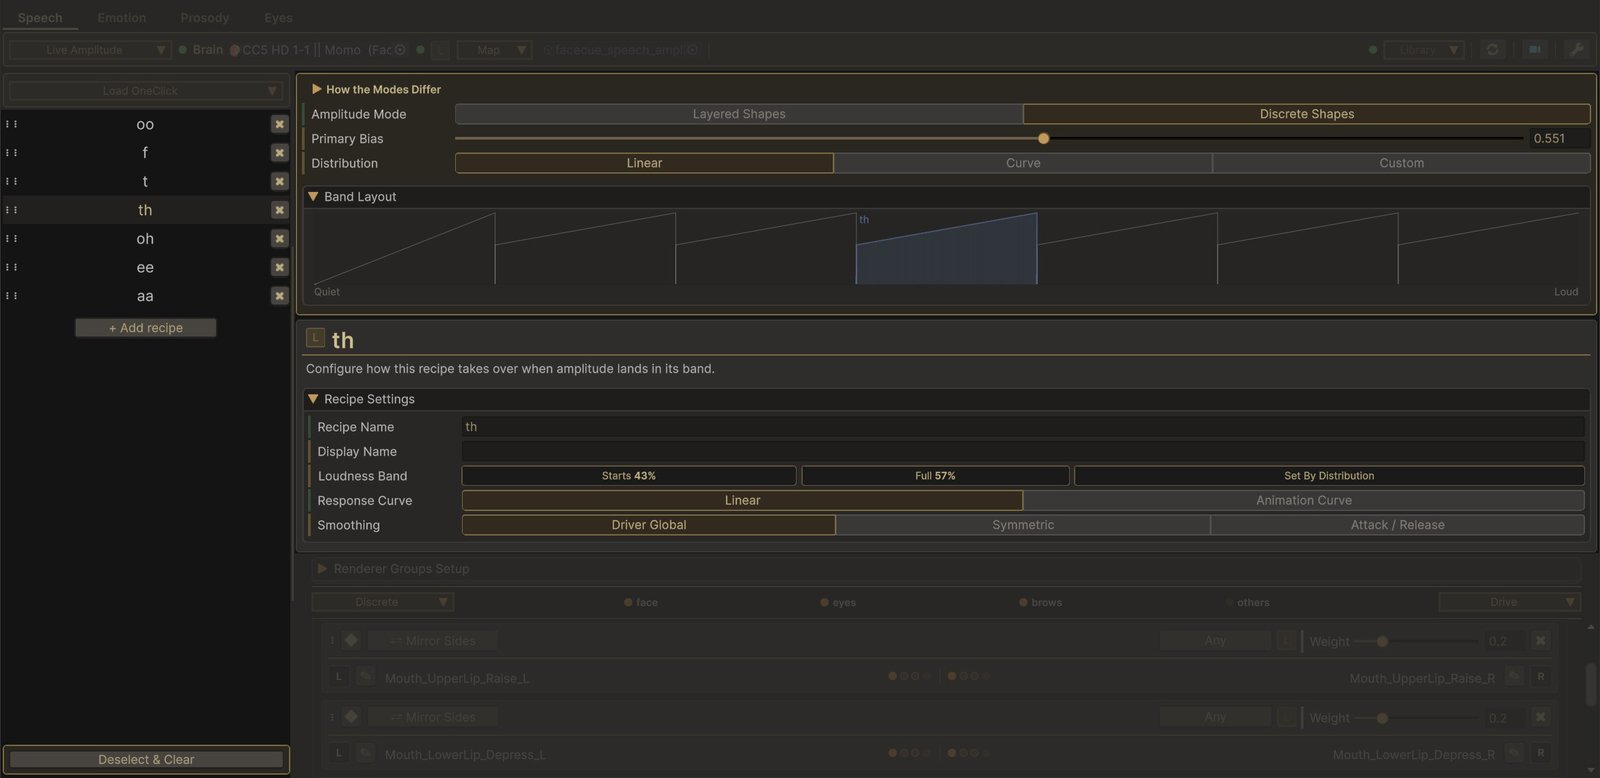
th recipe selected. Click the image for it at full size.- The channel mode. Live Amplitude opens this map.
- How the Modes Differ. What each mode and setting below it does.
- Amplitude Mode. Layered Shapes or Discrete Shapes, for the whole map.
- Primary Bias. How strongly the active recipe shows. On Layered Shapes this row is Band Overlap.
- Distribution. How the bands are placed across the loudness range.
- Band Layout. Every recipe drawn across the loudness range, the selected one highlighted.
- The recipes. One per band, quietest at the top. Add, remove and reorder them here.
- Recipe Name and Display Name. The band's key, and the label the list shows.
- Loudness Band. Where the recipe starts to move and where it reaches full strength.
- Response Curve. How loudness inside the band turns into movement.
- Smoothing. How quickly the band settles.
Layered & Discrete
Amplitude Mode decides how the recipes combine, for the whole map. Switching it asks you to confirm, because it changes how every recipe responds.
Both graphs below draw five recipes placed by Linear, left to right from the quietest voice to the loudest and bottom to top from still to full strength, with the middle recipe highlighted. The channel's Band Layout draws the same picture for your own map.
Layered Shapes
Each recipe comes in once the voice reaches its band, climbs to full strength across it, and stays at full as the voice gets louder. The louder recipes build on top of the quieter ones, so on a loud voice every recipe below it is on at once.
Band Overlap sets how early each recipe starts to climb while the one below it is still on its way to full. At its lowest, each recipe reaches full just as the next one starts. Higher starts the next one sooner, so neighbouring shapes climb together, as the graph shows. It has no effect when Distribution is Custom.
Discrete Shapes
Only the loudest recipe the voice has reached shows, and it hands over to the next one where that one's band begins.
Primary Bias sets how strongly the active recipe shows. Lower ramps it up from nothing as the voice enters its range, higher snaps it straight to full, and the middle keeps it clearly visible without flattening the ramp. The quietest recipe always ramps up from nothing.
Which to Use
Layered suits open shapes that add up, a small, a medium and a large, which is how OneClick builds its SML Map. Discrete suits shapes that should never mix, which is how it builds its Pseudo Viseme Map. The channel's How the Modes Differ foldout explains both above the controls.
Distribution
Distribution places the bands across the loudness range for you.
- Linear spaces them evenly.
- Curve packs more of them toward the quiet end, where speech spends most of its time.
- Custom keeps the Loudness Band you set on each recipe. Switching to it starts each band where Linear or Curve had placed it.
Open Band Layout, under Distribution, to see the result. It draws each recipe as a line, running left to right from the quietest voice to the loudest and bottom to top from still to full strength, with the selected recipe highlighted. It follows Amplitude Mode, Primary Bias, Band Overlap, Distribution and each recipe's Response Curve as you change them.
A Band's Settings
Each recipe carries its own settings in Recipe Settings.
Loudness Band is two values, each a percentage of the voice's loudness range. The first is where the recipe starts to move, and the second, Full, is where it reaches full strength. On Layered Shapes the recipe stays still below its start, climbs between the two, and holds at full strength above. On Discrete Shapes the band's top is wherever the next recipe up starts, which is where this one hands over.
Under Linear and Curve the band is placed for you and reads as chips, beside a Set By Distribution chip. Under Custom you type both values, except on Discrete Shapes, where Full follows the next recipe and is greyed.
Response Curve shapes how loudness inside the band turns into movement. Linear ramps straight across the band, from where the recipe starts to where it reaches full. Animation Curve lets you draw it, left to right across the band and bottom to top from no movement to full. Try an S-curve for a soft onset and release, a plateau to hold before the top of the band, or a steep start for a more percussive feel. The same curve applies whether the voice is rising or falling. On Discrete Shapes every recipe but the quietest starts its climb at Primary Bias, so the curve is read only from the Primary Bias value rightward.
Smoothing is how quickly the band settles. Driver Global uses the Speech driver's own smoothing, and a band can override it with a single settle time or with separate attack and release times.