Emotion Channel
The expressions a layered emotion is built from, the solid emotions, and the preview that plays an emotion the way the game does.
Emotion reaches the face in one of two ways, and the channel mode at the top of the window says which map you are editing: Layered Emotions or Solid Emotions. A character plays one of them, chosen by Emotion Source on its Emotion driver. The OneClick Wizard fills the layered map by default and the solid one when asked, so a character can carry both and switch between them without a rebuild. Layered & Solid sets out the difference from the performance side. This page is the authoring side.
Layered Emotions
You Author the Pieces, Not the Emotions
On the layered map you are not authoring Angry or Happy. You are authoring expressions: a brow raise, a squint, the corners of the mouth pulling down. An emotion is assembled from several of them, each playing at the share of its strength that emotion asks for, and each on its own timing inside it. What carries a feeling is the combination rather than any one piece.
Which expressions make up each emotion, how much of each, and when each arrives and leaves ship with FaceCue. What is yours is how every expression looks on your character. So a layered Angry on your rig is your brow and your squint, arranged FaceCue's way, and an expression you reshape changes every emotion that uses it. Opening up the arrangement itself is on the roadmap, see The Library.
This is the difference that matters when you pick a mode. A layered emotion arrives as a face doing several things slightly out of step, the eyes first and the smile after, the way a real expression arrives. It needs a rig with a good set of small blendshapes to build from.
Why the Pieces Are Built This Way
When someone reads a face, their eyes go to the eyes and brow first, whatever the feeling is, and the mouth is read last. So the expressions above the mouth carry a feeling from its first moment, and most emotions still have a full mouth of their own on top of that. A feeling is a few shared pieces in different proportions rather than a blendshape of its own, which is how the subtler emotions are built on real faces too.
Author Every Expression at Its Strongest
Take each expression as far as you would ever want to see it, then stop short of distortion. Every emotion that reaches for it decides how much to take, and it can only ask for less than what you authored, never more. An expression built halfway quietly caps every emotion standing on it.
The same goes for restraint. Build each expression complete, and let the scene decide how much. A performance plays an emotion at less than full whenever a scene calls for less, and that is what carries a restrained moment. Authoring the restraint into the shape leaves nothing to take away later.
Tune the Pieces, Not One Emotion
Every emotion takes its own share of each expression, and those shares ship with FaceCue. So an expression reshaped until one emotion looks right can throw every other emotion that uses it out of balance.
Match each expression to its reference sketch instead, the drawing every expression carries. If the whole set reads too strong or too weak on your character, adjust it evenly: all of it together, or one area at a time, such as every eye piece or every mouth piece. Play whole emotions in the preview to check the result, and when something reads wrong in several of them, look for the area to adjust rather than one piece to fix.
Match the Sketch in Spirit
A reference sketch shows the feel of an expression, how strong it is and how its parts sit against each other. It is not a pose to copy exactly. Where a sketch is lopsided, which side it favours is not a rule.
The exception is the few expressions whose descriptions say they are one-sided: the single raised brow, the single wide eye and the smirk. They play together, so keep them on the same side as each other, and a character's asymmetry reads as a trait rather than a twitch. Mixing the sides is still your call, but play the emotions that use them first.
Keep Emotion and Speech on Separate Blendshapes
Where the rig gives you enough to choose from, leave the blendshapes the mouth uses for speech out of the expressions. Emotion and speech play at once, and on separate blendshapes both can show in full: the words shape the lips while the emotion draws the corners of the mouth, and each still reads. On the same blendshape they have to share it, and neither shows as fully as it could. On a smaller rig some overlap is unavoidable and perfectly fine. It just wants to be a decision rather than an accident.
One expression breaks this on purpose. The gasp opens the mouth a little, a caught breath. It is kept small, and the words simply talk over it.
When the Character Speaks
Expressions authored at their strongest and kept off the speech blendshapes leave one thing to settle while the character talks: how much of an emotion's mouth the words make room for.
The words come first on the mouth. Where speech and an emotion push the same mouth blendshape, the words take the lead and the emotion keeps a share, so the words stay readable. The mouth blendshapes speech is not using keep the emotion in full, and the brow and the eyes keep it through the whole line.
The shipped emotions are authored with this in mind, so most of them sit well on a speaking face. A few with a strong mouth, Angry the clearest, can still crowd the words. There are three ways to settle one:
- Play it at a lower intensity while the character speaks.
- Tone down the mouth pieces evenly, here in the designer, when emotions in general crowd the words on your character. Toning down only the pieces Angry uses would unbalance every other emotion built on them, see Tune the Pieces, Not One Emotion.
- Set Lower Scope to Per Region on the FaceCue Resolver. The emotion then gives way across the whole lower face while the character is speaking, not only on the blendshapes the two share, and comes back gently once the line has ended. Emotion and Speech on the Mouth sets out what that trades away.
Why It Is Designed This Way
Nothing about speech is baked into an expression. Each one is authored complete, and how an emotion shares the mouth with the words is decided while the character plays. So the same Angry can hold its full snarl through a silent glare and still make room for a shouted line, and how much room it makes is yours to set, line by line through its intensity or for the whole character on the resolver, without reshaping a single expression.
An expression softened in advance to suit speech would be softer everywhere, including every moment the character is not talking. Keeping the shapes full and the relationship adjustable is what leaves you the most creative control over the performance.
Previewing a Layered Emotion
An expression looks one way on its own and another inside an emotion, next to the pieces it shares the face with and arriving at its own moment. So the channel can play a whole emotion for you, as it will run in the game, before a single line is baked.
Picking an Emotion
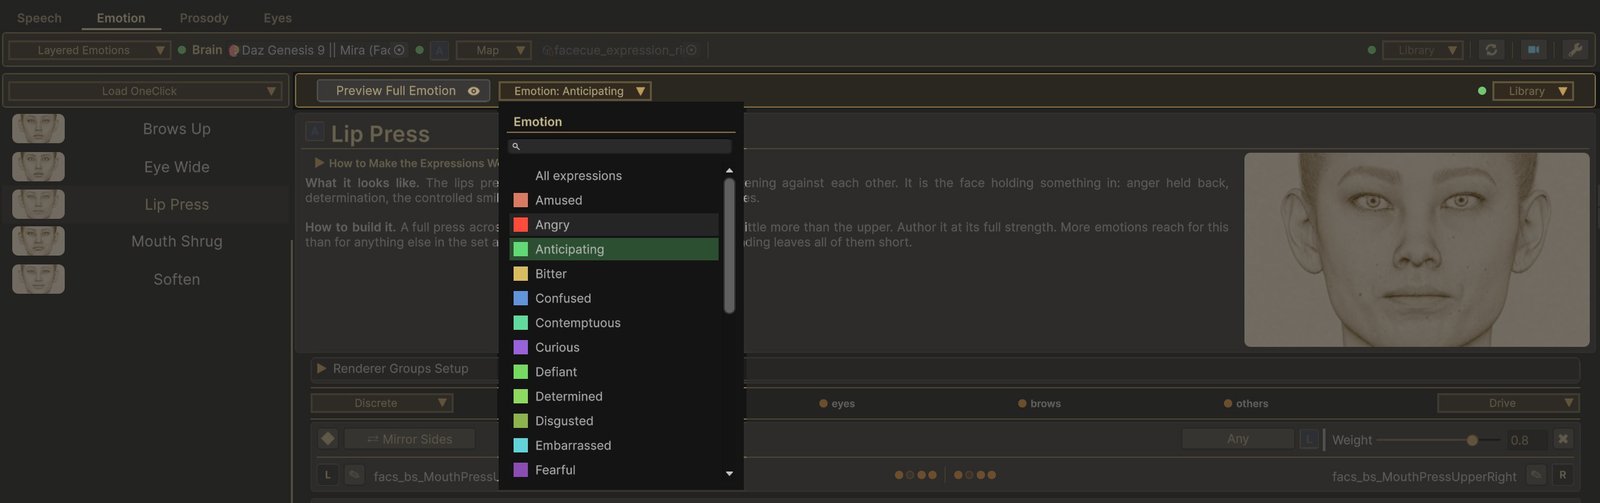
The Emotion dropdown, above the right pane, groups the expression list by emotion. Pick an emotion and three things happen: the list narrows to the expressions that make it, the pane shows the emotion rather than a single expression, and the emotion goes on the face. Pick an expression from the narrowed list to edit it as usual, and use Preview Full Emotion beside the dropdown to bring the emotion back. All expressions clears the pick.
 1
2
3
4
5
6
1
2
3
4
5
6
- Preview Full Emotion. Puts the picked emotion back in the pane and on the face. Off stops it. It waits until an emotion is picked.
- The emotion. Which emotion the list is narrowed to.
- Search. Type to find an emotion by name.
- All expressions. Clears the pick and lists every expression again.
- The emotions. Every emotion the library declares, each with its colour.
- The narrowed list. Only the expressions this emotion is built from. Pick one to edit it.
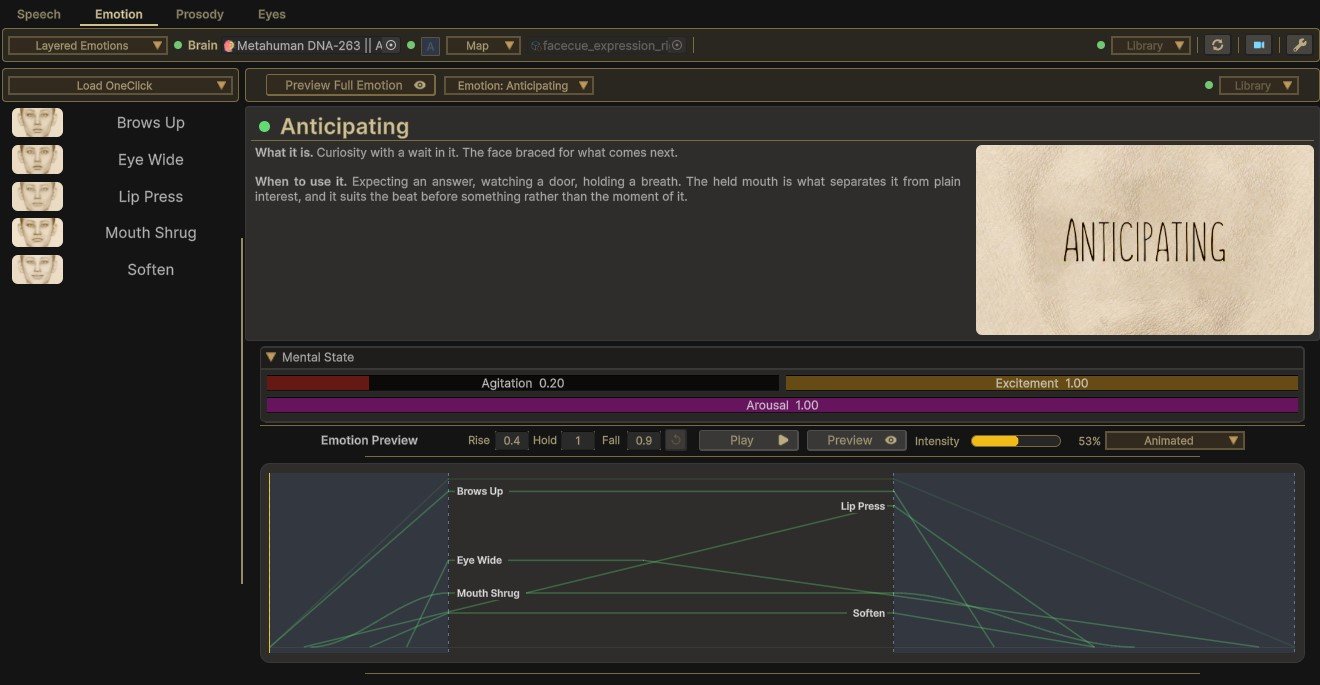
The emotion's pane opens with its own description, what the emotion is and when to use it, and its Mental State: how agitated, excited and aroused it is, which is what the rest of the character picks up from it. Mental State covers what reads those values.
Peak & Animated
The Emotion Preview bar has two modes.
- Peak puts every expression on the face at the strength it reaches in this emotion, blended into one still pose. It is the emotion's fullest look, and the quickest way to judge whether the pieces agree. The pane lists each expression with how far into it the emotion reaches.
- Animated plays the emotion the way the game does, each expression easing in, holding and easing out on its own timing, on a loop.

Under Animated, Preview puts the emotion on the face, Play runs it and Pause holds it on the frame you are looking at. Space plays and pauses too.
 1
2
3
4
5
6
7
8
9
10
11
12
1
2
3
4
5
6
7
8
9
10
11
12
- The emotion. Named, with its colour.
- Its description. What the emotion is, and when to use it.
- Mental State. How agitated, excited and aroused this emotion is. See Mental State for what reads them.
- Rise, Hold and Fall. How the preview loop plays, in seconds.
- The reset. Puts all three back.
- Play. Runs the emotion. Pause in its place holds it.
- Preview. Puts the emotion on the face.
- Intensity. Scales the whole emotion in the preview, see Intensity.
- The mode. A dropdown holding Peak or Animated, and the preview's settings, see Preview Timing.
- The envelope. The emotion itself. The shaded ends are its rise and fall, and the dashed lines bound its hold.
- An expression. Its own line inside the envelope: when it comes in, how long it holds, when it leaves, and how high it reaches.
- The playhead. Where the loop is.
Animated needs the character's Emotion driver to be set up. Without it the mode list offers Peak alone, and a note under the preview says so. Either mode needs the window's drive on Drive to reach the face, see Driving the Character.
Intensity
Intensity, just left of the mode dropdown on the bar, scales the whole emotion the way a cue's intensity does in the game, so you can see how the emotion reads at half strength before a transcript asks for it. On Peak it is the only control in the middle of the bar. Both modes follow it, and under Animated a drag reaches the face when you let go. It changes the preview only: the emotion stays as authored, and the value is remembered between sessions.
Reading the Timeline
Under Animated, the pane shows the emotion as a timeline in place of Peak's list. The emotion's own envelope is drawn behind, its rise and fall shaded and its hold between dashed lines. Each expression is its own labelled line inside it: when it comes in, how long it holds, when it leaves, and how high it reaches. A playhead runs across it as the emotion plays.
- Click an expression's shape to pick it.
- Drag along the row to move to a frame. The preview pauses there and stays paused when you let go. Dragging also starts the preview if it was not running.
- Hover an expression to see what this emotion sets for it, such as its strength and any timing of its own. Hold Shift to see every timing value and where each one comes from. The tooltip waits a moment before it opens, so it stays out of the way while you work, and Timeline Tooltip Delay in the window's Settings menu sets how long.
The timeline is a view of the emotion, not a place to change it. The arrangement ships with FaceCue, as above.
While the character speaks, speech takes over the mouth. When that costs an emotion a noticeable share of its mouth movement, a note under the timeline says roughly how much it keeps. The rest of the face is unaffected.
Preview Timing
On the bar, Rise, Hold and Fall set how the loop plays, in seconds.
- Rise and Fall start at the emotion's own values, and those are real: every emotion has its own, and they are what the character plays whenever a ramp is left unset, from a transcript tag to a script. Ramps lists where that applies. Changing them here stands in for a cue that sets its own ramps, so it is a deliberate override.
- Hold is the preview's own, since emotions do not author a hold. The character's own minimum still applies, so a very short hold can read as longer than you set.
The reset button beside them puts all three back at once.
The mode dropdown, where you pick Peak or Animated, holds the preview's own settings below a separator:
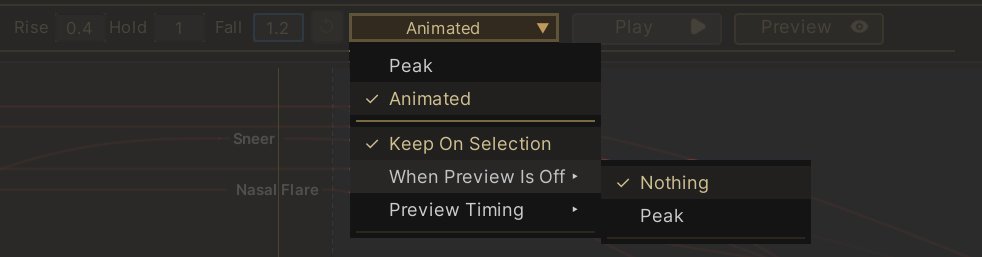
- keeps the whole emotion on the face when you pick one of its expressions to edit, so you can shape a piece while seeing it in place.
- decides what the face shows under Animated while the preview is stopped: , or the pose. On Peak it shows greyed out, since it only applies to Animated.
- puts the timing back one field at a time: , and . Each entry is greyed out while its field is already at its own value.
Solid Emotions
One Recipe per Emotion
On the solid map, each emotion is one recipe, authored directly as its own set of blendshapes. Nothing assembles it from smaller parts, and nothing is shared between emotions. If the rig already carries a good Angry blendshape, this is where it goes.
The list holds the emotions the emotion library declares. An emotion that is not declared there, or is spelled as an alias or in another casing, never plays, and the channel lists any it finds so they are easy to fix. Right-click an emotion to remove it.
Solid is simpler to reason about and easier to shape by hand, at the cost of the detail a layered emotion arrives with: a solid emotion fades up as one pose rather than as pieces arriving in order.
Author Each Emotion Just Right, and No Further
This is the opposite of the layered advice. Take each emotion to the strength that feeling should read at when it is at its fullest, then stop. On the layered map an expression is a component that each emotion scales down. Here the emotion is the finished article, and nothing further along trims an overdone one back into shape, so whatever you push past what the feeling actually looks like is what plays, every time it is called.
The rest carries over. Build each emotion as the whole face, and let the scene decide how much of it plays. Keep emotion and speech on separate blendshapes, for the same reason as on the layered map.
Select an emotion and the channel previews it on the face straight away, like any recipe. See Previewing a Recipe.