Tuning Workflow
How to look at what you are tuning. The designer writes a recipe onto the character while you edit it, and the whole job is judging the result on the face, so the loop is: pick a recipe, drive it, look, adjust, and look again. This page is about the looking.
Where to Look
We considered giving the designer a preview window of its own, a little viewport with the head in it, and decided against it. The Game view is the better place. It renders the character through your own render pipeline, with your lights, your materials and your post-processing, at the size and angle it will be seen in the game, and a shape that reads well there is a shape that reads well. A preview window would have shown you something else.
What the Game view lacks is a camera on the face, so we built one. It is an affordance we made for our own sake, since we spend our days in this window, and it is yours too. It lives on the toolbar as the camera button.
The Camera Button
The button opens a small menu.
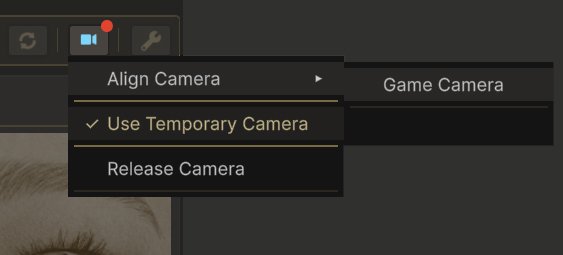
- Align Camera lists every camera in the scene, switched off ones included, and points the one you pick at the character's face.
- Use Temporary Camera makes a camera of FaceCue's own, points it at the face, and takes it away again when you are done.
- Release Camera appears while a camera is held, and ends it.
Either way the camera aims at the middle of the face, a little below the eye line, from a short distance in front. The button carries a small badge while a camera is held, so you can see the state at a glance, and the tooltip says which camera is looking and at what.
The Temporary Camera
We suggest the temporary camera, and it is what we use. It takes the face straight on with no perspective, against a flat light grey, and it wins the Game view outright while it is held, so nothing else in the scene competes with the face. It appears in the Hierarchy as FaceCue Face Camera (Temporary) and is selected when you make it, so the Scene view shows its preview as well.
It is temporary in the full sense. It is never saved into the scene, it cannot reach a build, and it is removed when you release it, when the window closes, when you enter Play Mode, and before any build starts. If the hold is still on when you come back, it is made again.
Its view is set in the Settings menu  , under Camera: Flat turns the perspective back on if you want a normal lens, Framing is how much of the character it takes in, Background picks the flat colour, the skybox, or nothing behind the face, and Post Processing renders through the project's post-processing so the face looks the way it will in the game. The two rows above them, Distance From The Face and Drop Below The Eyes, apply to any camera the button aims.
Borrowing a Scene Camera
If you would rather look through a camera of your own, pick it under Align Camera. The designer moves it onto the face and remembers where it was. Releasing puts it back exactly, nothing is recorded as an edit, the scene is not marked dirty, and if you save the scene while the camera is on the face it is put back for the save and returned to the face afterwards, so the move never reaches disk. Its lens is left alone, since that is your decision.
What the Hold Survives
The hold is your intent, and it lasts until you release it. It survives switching tabs, saving the scene, a script recompile, and changing the character in the toolbar, where the same camera re-aims at the new face. If the character has nothing to aim at yet, no eye bones and no head bone, the camera waits where it is until one does. The hold ends when you release it, enter Play Mode, start a build, or close the window.
Driving the Character
Nothing shows on the face until the designer is writing to it. The drive mode is the dropdown at the top of the recipe editor, at the right end of the row of renderer group chips, and it has three settings.
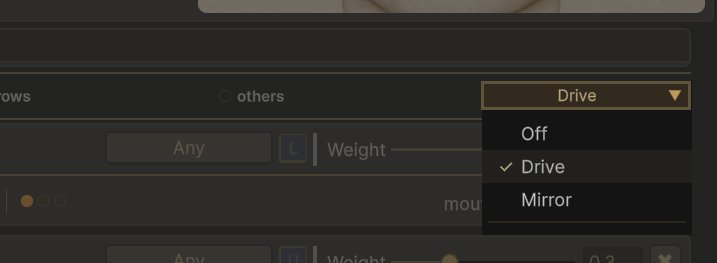
| Mode | What it does |
|---|---|
| Off | Writes nothing. The character keeps whatever pose it has. |
| Drive | Writes the recipe you are editing onto the character, continuously, so every change shows at once. |
| Mirror | Drive, and also the other way: a blendshape you move on the renderer itself is read back into the recipe. |
Drive is the one to leave on while tuning. Mirror is for the moment you would rather sculpt on the mesh than in the list, and it is unavailable on recipes whose components the library fixes.
Previewing a Recipe
With a character bound and Drive on, which is where the designer starts, clicking a recipe puts it on the face straight away. There is nothing to press: the recipe you select is the one the character wears, and every change you make to it shows as you make it.
Speech, Emotion and Eyes each add a preview mode of their own, covered on their pages: Speech Channel, Emotion Channel and Eyes Channel.
Who Drives the Face
Several things can write to a character's face, and FaceCue never lets two of them do it at once. The face goes to whichever has the stronger claim, and the one that gives way is reset cleanly, so nothing is ever left half-driven. The order, from strongest to weakest:
- The live performance. In Play Mode the character's own drivers own the face, and both editor tools stand aside. The Cue Clip Composer stops its preview and will not start one again until you are back in Edit Mode, where it picks preview up on its own. The Face Rig Designer locks, and the lock can be pressed to edit anyway for that play session, returning the next time you enter Play Mode.
- The Cue Clip Composer, playing or scrubbing. A performance being played beats a recipe being tuned.
- The Face Rig Designer, driving. With Drive or Mirror on, a recipe selected, the blendshape picker open or a preview running, the designer holds the face.
- The composer, previewing but idle. A composer with Preview on and nothing playing only wants the face, and gives it up to a designer that is driving.
So the two editor tools divide the work naturally. The Face Rig Designer previews one recipe at a time, and the Cue Clip Composer previews a whole performance, a baked line with everything running, which is where to go once the recipes are shaped, to see them in a sentence. Press Play in the composer and the designer steps back. Stop, and the designer picks the face up again.